-
Shop
- Adidas
- Advanced Technologies
- Apple Accessories
- Armani
- Arts, Crafts & Hobbies
- Astrology & Tarot Products
- Bathroom
- Best-Sellers
- Black Friday Sale
- Calvin Klein
- Car Accessories
- Christmas Collection
- Dating & Social Skills
- Denim
- 7FOR
- AGOLDE
- Antony Morato
- Armani Exchange
- Boss
- Brunello Cucinelli
- Calvin Klein Jeans
- Costume National
- Desigual
- Diesel
- Dolce & Gabbana
- Dsquared²
- Ermanno Scervino
- Fendi
- Gianni Lupo
- Guess Jeans
- Ichi
- Just Cavalli
- Lee
- Levi's
- Liu Jo
- Morgan De Toi
- Mother Denim
- Only
- Pepe Jeans
- Pinko
- Replay
- Tommy Hilfiger Jeans
- Valentino
- Vero Moda
- Digital Resources
- Easter Products
- Education & Learning
- Fall 2025 Fashion Best-Sellers
- Family & Parenting
- Fashion
- Accessories
- Alexander McQueen
- Bags
- Bags & Wallets
- Balenciaga
- Belts
- Blazers
- Blouses & Shirts
- Bottega Veneta
- Bottoms
- Brunello Cucinelli
- Burberry
- Chanel
- Chloé
- Dior
- Dolce & Gabbana
- Dresses
- Etro
- Fendi
- Gucci
- Hats & Hair Accessories
- Hoodies & Sweatshirts
- Jacquemus
- Jewelry
- Jil Sander
- Jimmy Choo
- Kiton
- Laptop Sleeves
- Luggage
- Luggage Bags
- Men's Fashion
- Miu Miu
- Off-White
- Outerwear
- Passport Covers
- Phone Cases
- Prada
- Rick Owens
- Saint Laurent
- Scarves
- Shoes
- Skirts
- Socks
- Socks & Tights
- Sunglasses
- Sweaters & Cardigans
- The Row
- Tom Ford
- Tops & Shirts
- Trousers
- Tumblers
- Valentino
- Valentino Garavani
- Versace
- Vivienne Westwood
- Watches
- Fashion Accessories
- Father's Day
- Fitness & Yoga Guides
- Furniture
- Gadgets
- Gift Guide Collection
- Health & Beauty
- Health & Wellness
- Home & Garden
- Home Electronics
- Home Supplies
- Independence Day
- Kids & Babies
- Kitchen
- Kitchen Best-Sellers
- Lighting
- Luxury Brands Collection
- Mother’s Day
- Nike
- Patio, Lawn & Garden
- Personal Growth
- Pet Care
- Pets
- Pinterest Best-Sellers
- Samsung Accessories
- Sport & Outdoors
- Summer 2025 Fashion Collection
- Super Deals
- TikTok Growth & Monetization Mastery
- Tommy Hilfiger
- Travel
- Travel & Outdoors
- Wealth
- Wealth Building
- Budgeting & Saving
- Cryptocurrency Investing
- Debt Management
- Entrepreneurship & Business Growth
- Family Finance & Budgeting
- Financial Independence
- Financial Mindset & Psychology
- Financial Planning
- Frugal Living & Expense Hacks
- Goal Setting
- High-Income Skills
- Investing Basics
- Leadership
- Motivation
- Networking & Mentorship
- Passive Income Strategies
- Real Estate Investing
- Side Hustles
- Stock Market Investing
- YouTube Shorts Best-Sellers
- Popular
- Best deals
DIY Wooden Nixie Tube Clock: Prep, Build & Display Tips
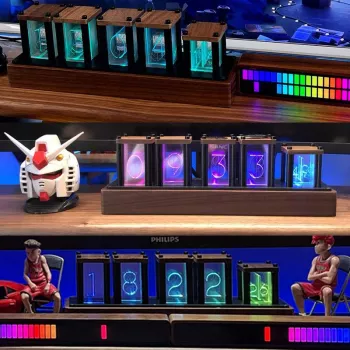
DIY Wooden Nixie Tube Clock: Build a Warm, Retro Desk Clock That’s Actually Fun to Assemble
A DIY wooden nixie tube clock hits that rare overlap of hands-on making and daily usefulness: the build is part of the experience, and the finished clock becomes a centerpiece on a desk, shelf, or nightstand. This guide walks through what to expect from a DIY wooden nixie tube clock kit, how to set up for a smooth assembly, and how to place and care for your finished clock—without guessing at details that vary by batch or build style. For more guidance, see Nixie Tube Clock Project.
What Makes a Wooden Nixie Tube Clock Special
Nixie-style time displays have a distinctive presence. Instead of reading like a flat screen, the digits feel like a physical object with depth and glow. If you want a quick primer on where this look comes from, the history behind nixie tubes is worth a skim. For further reading, see Nick’s Awesome Nixie Clock.
- Nixie-style display brings a retro glow that reads differently than LEDs: more like an object than a screen.
- Wood housing softens the “electronics bench” look, making the clock fit naturally in living rooms, studios, and minimalist workspaces.
- DIY assembly turns the clock into a personal build: satisfying for makers and memorable as a gift.
- A finished nixie clock pairs well with mechanical keyboards, turntables, vinyl shelves, and mid-century décor—without requiring a full retro setup.
Who This DIY Clock Is Best For (and When to Skip It)
These clocks shine when you want both an end result and a small project you can take pride in. If you enjoy careful, step-by-step building, the assembly time feels like part of the purchase—not a chore.
- Best for: makers who enjoy light assembly, hobbyists who want a display piece, and gift-givers looking for something more meaningful than a ready-made gadget.
- Best for: desk setups where the clock can be seen and appreciated; nixie-style clocks are as much ambient décor as they are timekeepers.
- Consider skipping if: the build space is limited, soldering/assembly is not appealing, or the clock needs to be completely maintenance-free.
- Good middle ground: treat it like a weekend project—set aside uninterrupted time and the build becomes part of the value.
Quick Fit Check: DIY Wooden Nixie Tube Clock vs. Typical Desk Clock
| Need | DIY Wooden Nixie Tube Clock | Typical Plug-In Desk Clock |
|---|---|---|
| Build experience | Hands-on assembly project | None (ready to use) |
| Visual impact | High: warm, retro display + wood body | Varies: usually functional first |
| Gift value | High: memorable and personal | Medium: practical |
| Placement | Best where it’s visible and stable | Anywhere power is available |
| Care | Light dusting; careful handling | Usually minimal |
What to Prepare Before Assembly
A clean setup prevents most “why isn’t this fitting” moments. Our team’s rule: if you can keep parts from sliding and your lighting is strong, you’ve already made the build easier.
- Work surface: clear a stable table with good lighting; a light-colored towel or mat helps keep small parts from rolling away.
- Basic tools (commonly useful for kits): small screwdriver set, tweezers, flush cutters (if applicable), and a soft cloth for handling the wooden shell.
- If soldering is part of the kit: temperature-controlled soldering iron, solder, and ventilation; keep a damp sponge or brass wool for tip cleaning.
- Power and safety: keep liquids away from the build area; unplug power when adjusting wiring; avoid handling electronics with static-prone clothing.
- Time planning: set aside a focused block of time rather than trying to squeeze the build between tasks—accuracy improves when the pace is calm.
If you want a refresher on fundamentals, SparkFun’s through-hole soldering guide covers technique and safety in a clear, practical way.
Assembly Flow That Helps Prevent Rework
The easiest way to enjoy a DIY clock build is to avoid backtracking. A few habits up front can save you from reopening the enclosure or redoing a step you already “finished.”
Where to Place It: Making the Glow Work for Your Space
Care, Longevity, and Everyday Use Tips
Pair It With the Right Power Setup
In-Stock Picks from Our Team
- DIY Wooden Nixie Tube Clock — the project and the finished desk centerpiece in one.
- 65W GaN USB C Fast Wall Charger with Quick Charge — a compact option for powering a tidy workspace setup (as long as it matches your device’s requirements).
- 66W 5A Fast Charging Spring Retractable USB Type C Cable – For Car & On-the-Go — helpful when you want fast stow-and-go cable management on a desk or shared space.
FAQ
Is a DIY wooden nixie tube clock difficult to assemble?
Most people do well with a calm, step-by-step approach and a focused block of time. Inventorying parts first and double-checking component orientation as you go are the two simplest ways to avoid mistakes and rework.
Do nixie-style clocks run hot or need special placement?
Give your clock a stable surface, keep it away from moisture, and avoid direct sunlight so the display stays readable. A little breathing room around the enclosure also helps, especially near other warm electronics.
What power accessories help keep the setup clean?
A quality compact wall charger can reduce outlet clutter, and a tidy cable option can keep the clock area neat day to day. Always match the connector type and rated output to your clock’s power requirements.
Recommended for you
Rechargeable Fabric Shaver: Remove Pills & Lint Fast
Oct 16, 2026
Sorry I’m Late—My Cat Was Sitting On Me Crewneck
Oct 16, 2026







Leave a comment